Paragons of the Klaxxi (Talents WIP) by HaranBanjo

0 Votes
Rating Pending

Paragons of the Klaxxi (Talents WIP)

By: HaranBanjo
Last Updated: Apr 21, 2017
Quick Share

Paragons of the Klaxxi (Talents WIP)

Servants of the Old Gods

I wanted to start by remarking that it is extremely impractical to make a 5-man hero, and this concept is just for fun, I'm not actually implying it'd be cool if they added something like this (Although it'd be incredibly cool). Maybe in the far future, when we'll have 150+ Heroes, ideas are over, and making 10 heroes at once doesn't hurt that bad on the release schedule.

That said, as you already imagined, this IS a 5-man hero.

The basic point of this concept is, just like in the Siege of Orgrimmar boss encounter, you don't actually fight (in this case, control) all 10 Paragons at once (well, 9 in the encounter), but rather swap them once they die, much like you'd change hero in Overwatch.

I considered making the roles preset and lock every player in the role they select and make only 2 choices available to them, but I then realized that'd take away the best part of their supposed gameplay, which is to f*** around with their own comp in-game. Yes, that'd also make them extremely hard to balance, and that's why I thought of a "Mana Crystal Coin"-like solution to give the opposing team, more on that later.

Basic summary of how this hero works (and how I'd make it work):
- Needless to say, this is a 5-premade hero only. If you want to play them in HL, all players must agree on it by selecting the Paragons portrait. Draft phase still goes ahead as usual, as the team who picks the Paragons still has to make choices for bans. You can't ban Paragons once they've been locked by someone.
- All Paragons share the same trait, which allows them to choose from a pool of 6 heroes on death (up to 10 if other teammates are dead). No duplicates allowed. Once someone locks their Paragon, they keep it until death, and no one can choose that one unless the player who picked it gets another Paragon.
- Every Paragons' talent choice is definitive and unchanging for all players, which means: for example, should you choose Kil'ruk, then swap to Malik at say 12, then swap again to Kil'ruk at say 21, you will find that Kil'ruk has kept all the talent choices you made till 10 and you get to choose his talents from 13 to 20 all at once. Should you choose Malik again, you'll find he's kept all his talents just like Kil'ruk. However, if someone else was playing Malik before you did and he chose different talents than you would have, your whole team is stuck with those talents for that particular Paragon. Making every talent choice individual would make them too flexible and difficult to counterplay, as they'd basically get 5 talent resets per Paragon.
- Obviously, making a hero that allows comp changes to be made directly in game would be a nightmare to play against in Ranked, as that'd negate the whole purpose of a Draft Screen, and that's why I thought of 2 solutions:
1. The one I'd personally go with as it just sounds like too much fun (and the one I balanced the various kits around), make every Paragon avalaible for picking for every player, and give the opposing team a talent reset - ult included - on every death.
2. The one I don't like cause in my opinion takes away much of the fun from playing the Paragons would be to lock players into a role (supp, bruiser etc) and give them a choice of only 2 Paragons.
- Of course, if both still proved to difficult to balance, individual Paragons bans could still be introduced. It'd obviously make the select screen much cleaner to have just one icon for the Paragons, but balance is more important.

Enough talking about the technical aspects, let's dive into the concept! Because of limitations, I squeezed every Paragon's kit into the Basic Abilities descriptions.

Yellow is used to indicate individual innate traits.
Light blue is used for notes.

Combat Trait

1
Battlefield Adaptability
Upon death, you will be presented with a character screen. You can change the character you're playing according to the needs of the team.

This is just their basic concept, and if it proves too lackluster as a trait, I took inspiration from the Orgrimmar encounter to design another trait, which is...
2
Paragon's Purpose
Every time a Paragon dies, the nearest alive Paragon gets 25% increased movement speed, 10% damage and 15% armor for 6 seconds. Stacks. The duration is refreshed if the buff is re-applied.

Which would make for interesting plays, assuming whoever is playing the Paragons has godlike positioning sense and enough coordination to let the buff stack on the last man standing.

Primary Abilities

1
Korven the Prime

Korven is meant to be a frontline Warrior with low mobility who can execute multiple forms of CC gained through talents. Very effective against other Warriors and melee damage dealers. Super low damage capabilities, as only one of his ults deals some form of damage. Average Basic Attack power.

Korven has 15 armor baseline.
2
Q - Shield Bash
Cooldown: 4s
Melee range

Korven slams his kyparite shield on a target enemy, knocking them to the ground and stunning them for 0.75 seconds. If other players are close to the target when the ability is cast, a soundwave silences them for 1.25s. Deals no damage.

Low cooldown mandatory, as this is the only ability that allows Korven to harass a team coordinated enough to avoid focusing him
3
W - Intimidating Shout
Cooldown: 15s
Melee range

Korven lets out a shriek that makes all enemies in a small area around him unable to damage him for 2s. The affected players can still deal damage to the rest of Korven's team during that time. Effective while Korven is Encased in Amber.
4
E - Encase in Amber
Cooldown: 18s
Self-cast


Korven enters Stasis, cocooning himself in a prison of amber that has a health bar and lasts 2.5s seconds. During this time, Korven progressively heals himself for 40% of his health. The amber prison can be destroyed early by enemy damage.
5
R1 - Retaliation
Cooldown: 60s
Self-cast

Korven Parries all Basic Attacks made against him, and damages nearby enemies for the same amount, split evenly. Lasts 4s. Effective while Encased in Amber.
6
R2 - Vibration-enhancing Kyparite
Cooldown: 90s
Medium range

Korven tosses Amber around him, soaking enemies in a medium area around him and reducing their Armor by 20% for 2.25s.
7
Skeer the Bloodseeker

Skeer is a melee Bruiser-like damage dealer that regenerates health by fighting. He's similar to Thrall and Fury Varian, but while these two heal for a set amount, Skeer's healing increases the longer he stays in combat and can keep his Bloodspawns alive. Resistant to CC, but low mobility.

Skeer does not use Mana.
8
Q - Reap Blood
Cooldown: 8s
Short range

Skeer swings his weapon in front of him, dealing damage in a wide arc. If he hits a Hero, a Bloodspawn is summoned to attack the closest enemy, preferring Heroes. The more Heroes Reap Blood hits, the more Bloodspawns will be summoned (max 2 per cast). Every time Bloodspawns hit an enemy Hero, Skeer is healed for a small amount. Bloodspawns last for 10 seconds. Hitting a Hero with Reap Blood will refresh the duration on all your Bloodspawns.

Bloodspawns are conceived to be more or less like Naz spiders pre-rework, untargetable and unkillable but moving at the standard hero speed, so it is theoretically possible to kite them and let them expire. They deal laughable damage, but that's counterbalanced by the constant healing they give Skeer. Mind that, unlike Anub's Leeching Beetles and Zagara's Hydralisk Transfusion, there's no reason for a range limit on Bloodspawns' healing (as that only occurs when they attack players), so if you get attacked by them and some dumbass teammate is allowing Skeer to keep them alive, you'll give healing to Skeer no matter how far away you are.

9
W - Bloodletting
Cooldown: 14s
Self-cast, Melee range

Skeer gains 50% increased Attack Speed on his next 5 Basic Attacks. Each strike dealt during Bloodletting leaves a bleeding wound that deals very moderate progressive damage for 1.5s. Each Bloodletting-empowered consecutive hit against the same target makes the damage stack, but the duration is only refreshed. Skeer gains Unstoppable as long as Bloodletting is active on a target. Bloodletting-empowered attacks must be consumed within 6 seconds, after which they expire.

The fantasy here is that smelling the blood of his enemies sends him in a frenzy, during which he'll stop at nothing.
10
E - Vampiric Drain
Cooldown: 1.5s
Long range

Skeer siphons an ally Paragon's Mana, restoring health equal to three times the Mana consumed.

Should this ability also be an offensive one? I conceived it as an out-of-combat recovery tool, but I don't want Skeer to rely on this to sustain himself in combat, and besides he's already got 2 very powerful Basic Abilities.
11
R1 - Sanguine Link
Cooldown: 60s
Medium range

Mark an enemy Hero for 8 seconds. During this time, 50% of the damage you deal will also be dealt to the marked target. If Reap Blood hits one or more enemy Heroes while the mark is active, two additional Bloodspawns will be summoned to attack the marked target. Ineffective if the marked enemy gets far enough.

Just for clarity, those 2 are in addition to the regular Bloodspawn summon, and do not count towards any cap.
12
R2 - Crimson Pools
Cooldown: 30s
Medium range
3 charges

Skeer creates a medium sized Pool of Blood at his feet. While standing in a Pool, each of Skeer's Basic Attacks will create a Bloodspawn. Pool lasts 8 seconds.

Pool roughly the area of Malf's roots, but square-shaped. Great for zoning. Strong synergy with Bloodletting.
13
Hisek the Swarmkeeper

Hisek is the premier Basic Attacker of the Paragons. He can be considered as a mash of Sylvanas, Valla, Raynor, Zul'jin and Nova. Squishy, vulnerable to dive, with average mobility and some options for soft CC. Trades survivability for devastating focusing abilities, but does not sport a strong AoE. And no, he doesn't use Focus, he uses Mana.
14
Q - Barrage of Arrows
Cooldown: 9s
Long range

Hisek sends a 50 arrow spiraling spray (a pentacontagon of arrows, if you prefer) flying in all directions around him, dealing damage to all enemies hit. He gains 4% movement speed for each individual target struck for 4s. Deals increased damage if Rapid Fire is on.

Does not need movement interruption, so it'd be visually cool as well. Like a blossom of arrows originating from you.
15
W - Powershot
Cooldown: 14s
Medium range

After a short delay, fires a powerful shot at a target, dealing strong damage and knocking them back by a respectable distance.

Can be cast while Aimed Shot is charging.
16
E - Rapid Fire
Cooldown: 0.5s
Self-cast

Hisek lowers his defenses by focusing all his attention on hitting the target. While Rapid Fire is active, Hisek has 30% decreased Armor, but each consecutive shot against Heroes increases his attack speed by 10%, up to a maximum of 80%. This bonus lasts for 3 seconds after the last shot impacts, and persists for its duration even if Rapid Fire is disabled. It can be refreshed if Rapid Fire is reactivated.
17
R1 - Aimed Shot
Cooldown: 30s
Medium range

Hisek locks his aim on a target. After 2 seconds, he fires a devastating shot that deals more damage the farther his target is.

Powershot can be cast while this ability is winding up.
18
R2 - Exhilaration
Cooldown: 60s
Self-cast

Instantly heal for 30% of Hisek's health. Also gain 30% Armor for 2 seconds.
19
Kil'ruk the Wind-Reaver

Kil'ruk is the equivalent of a stealth assassin, but mind you, his "stealth" ability has more in common with Medivh's Raven Form than actual stealth. You'll see what I mean. Not much to say aside from that, he's squishy, bursty, relies on surprise, mobility and skillshot landing. Has a couple of unique quirks, for example he's a ranged which is a bit counterintuitive given the fact his abilities deal more damage when he's near his target, but once you get used to him, he's should be pretty fun to play as. Ambushers always are.
20
Q - Windblades
Cooldown: 6s
Medium range

Kil'ruk shoots two Windblades in a V-shaped pattern, dealing damage and slowing the enemy they land on by 25% for 2 seconds. If they both hit the same target, they deal an additional 50% damage and their slowing effect is combined to 50%, lasting the same duration.

Passive: Kil'ruk's Basic Attacks are 50% faster when in melee range.
21
W - Gouge
Cooldown: 14s
Melee range

Kil'ruk incapacitates the target for up to 4 seconds. Any damage the target receives will break the effect. Kil'ruk automatically stops attacking the target once the ability has been used.

While a Gouge effect is active on a target, this ability turns into Mutilate.

There's obviously a hidden 0.25s or so window of time during which Kil'ruk's attack will not wake the target anyways, to make sure Gouge doesn't go to waste on a Basic Attack that overlaps with the duration of the CC effect.
22
W - Mutilate
Cooldown: N/A
Melee range

Kil'ruk Mutilates a target affected by Gouge. The longer Gouge has been active on the target, the greater the damage of Mutilate will be.
23
E - To the Sky
Cooldown: 16s
Self-cast

After 1.5 seconds of cast, Kil'ruk soars to the sky, disappearing from the battlefield and only projecting his shadow on the ground. While in the air, he can cross terrain, and his shadow is greatly distorted when he does. However, he's not immune to AoE effects, which will take him back to the ground if any hits his shadow.

While soaring, To the Sky becomes Death from Above.

The idea is that you should keep your movements aligned with terrain to better disguise your shadow.
24
E - Death from Above
Cooldown: N/A
Short range

Kil'ruk swoops on the battlefield, dealing damage to enemies in a small area around his landing point and stunning them for 0.75 seconds.

The idea is to open with Death from Above, land a couple Basic Attacks, then Windblades, land another couple of Basic Attacks, then Gouge, position in front of the target and Mutilate, then Windblades off cooldown again, and at that point you should be able to get the killing blow.
25
R1 - Reave
Cooldown: 40s
Medium range

Kil'ruk leaps to a target, removing all shields and temporary Armor buffs and attaching to them for 2 seconds. While Kil'ruk is attached to a target, the target is Feared and takes a small amount of damage from Kil'ruk every 0.67 seconds. Kil'ruk is Invulnerable while attached.
26
R2 - Dagger Flurry
Cooldown: 80s
Very long range

Kil'ruk roots himself in place and starts throwing a flurry of daggers in a very long straight line for 3 seconds. The daggers will not go through units nor terrain, but they will deal more damage the closer the hit target is to Kil'ruk.

More or less same size and range as Hinterland Blast, but channeled instead of shot.

Secondary Abilities

1
Malik the Unscathed

Whereas Korven is the bulky tank that can withstand lots of abuse and quickly regenerate, Malik is more focused on fooling the enemy into thinking they are able to kill him. Similar to Zarya and Dehaka in that regard, but with a more limited timeframe to avoid damage. Lower health pool than most tanks, but makes up for that with his damage-cleansing abilities. Almost impossible to 100-0. Susceptible to CC. Melee, but with a quite long attack range.

Malik can attack while moving. His health bar always has a blue portion in it representing the damage he would recover from when using Q. This is only visible to Malik.
2
Q - Purifying Dash
Cooldown: 6s
Short range
2 charges

Malik dashes forward in the direction he's facing, purging himself of all the damage he received in the last second.

Li Ming's Illusionist-enhanced Teleport range. Could have more cd, but it's both mobility and survival. Would be cool to have a little smoke effect, like he used a ninja trick.
3
W - Impaling Spear
Cooldown: 17s
Melee range

After a short delay, Malik lunges forward and impales a target on the top of his spear for 1.75s, Silencing them and allowing him to carry the impaled target around. Malik cannot use his other abilities while carrying a target and will immediately release it if stunned, silenced, polymorphed, feared or taunted, but has 20% increased movement speed.
4
E - Cloaking Shadows
Cooldown: 13s
Self-cast

Malik slips into the shadows, becoming Invisible and Unrevealable for 2s. Using Basic Attacks will not break the cloak, but using Abilities will immediately reveal Malik.

Imagine getting speared out of nowhere and carried into the arms of your opponent. So much rage.
5
R1 - Iron Mantid
Cooldown: 80s
Self-cast, Melee range

Malik Evades all enemy Basic Attacks and Abilities for 1.75s. If he dodged damage from at least 2 Basic Attacks and 2 Abilities, at the end of the duration he stuns all nearby enemies for 1.5s.
6
R2 - Unscathed
Cooldown: 70s
Self-cast

Refills all your charges of Purifying Dash, and the next one will rewind damage by 2s instead of one.
7
Ka'roz the Locust

Ka'roz is designed to be a quick melee Bruiser with high movement speed, displaces and dashes. He can also buff other Paragon's movement speed, and has some resilience thanks to his W. On the downside, he deals little damage and can easily be 1v1'd if he's at the corner. He's like the Road Runner of the lot.
8
Q - Overwhelming Cleave
Cooldown: 10s
Medium range

Ka'roz lunges forward with his sword, dealing damage and pushing with him all enemies standing in proximity of the right side of his path.

He basically pushes with him all enemies that are standing just on the right of his path for a distance equal to Leoric's March. Very disruptive. Can be used like an Alarak Telekinesis if executed correctly.
9
W - Smashed Exoskeleton
Cooldown: 8s
Self-cast

Ka'roz gains 25 Armor for 3 seconds. If the amount of damage he takes during this time is greater than 25% of his health and both his Q and E abilities are on cooldown, a random one between the two is refreshed.
10
E - Flash
Cooldown: 12s
Self-cast

Ka'roz gains an additional 35% movement speed for 4 seconds. If he passes near a Hero while this buff is up (both enemy and ally) Ka'roz pushes them aside. Enemy heroes also take very light damage and get stunned for 0.5s, with the latter effect unable to occur more than once per Hero during each cast.

Passive: Ka'roz gains 15% movement speed at all times.
11
R1 - Blinding Amber
Cooldown: 22s
Medium range

Ka'roz throws a handful of Amber at a target enemy's eyes, Blinding them for 4 seconds.
12
R2 - Inciting Resonance
Cooldown: 60s
Global range

Ka'roz emits a soundwave that stimulates and increases other Paragons' movement speed for 6 seconds. The bonus starts at 25%, increasing and peaking at 50% at the 3 seconds mark, then progressively decaying.
13
Iyyokuk the Lucid

First off, don't get scared by this concept. It's actually pretty easy when you see it in broad strokes: he gets all sorts of random but powerful s*** that only a genius could predict with absolute accuracy. Don't focus on the details.
Iyyokuk is the most intelligent among the Klaxxi, and as such, his kit is insanely complicated compared to the rest of the Paragons, and it greatly rewards players who can follow his calculations and exploit the weaknesses Iyyokuk assigns to each opponent. As the premier mage of the Paragons, Iyyokuk is supposed to have the most potential out of all them, and as such, he's the only Paragon who has an actual Trait, in addition to the one shared among all other Klaxxi. His weaknesses are the same as any Kael or Jaina running around, but his life is somewhat harder than those two because of the randomic nature of his CC/escaping abilities. And yes, before you ask, I did get slightly inspired by the DotA Invoker. Just slightly.
14
D - Analytic Mind
Cooldown: 3s
Self-cast

Activate to re-assign a value to all enemy heroes in sight range.

Passive: Whenever Iyyokuk enters in sight of an enemy hero, he analyzes and assigns them a random icon, a random color and a random number. Values are reshuffled whenever Iyyokuk activates his trait or loses and regains sight of an opponent. Values are displayed above the enemy's healthbar (icon followed by number, accordingly colored).
Possible icons are: Mantid / Sonic Ring / Amber. Mantid has a 25% chance to appear, Sonic ring has a 35% chance, Amber has a 40% chance.
Possible colors are: Magenta / Yellow / Light Blue. Magenta has a 25% chance to appear, Yellow has a 35% chance, Light Blue has a 40% chance.
Possible numbers are: 3 / 2 / 1. 3s have a 25% chance to appear, 2s have a 35% chance, 1s have a 40% chance.
Iyyokuk's spells gain different effects depending on the value of the target hit.
15
Q - Arithmetic Curse
Cooldown: 12s
Range varies depending on the number of the target. Threes have to be very close to be targeted, Twos have to be at least at Medium range, while Ones can be hit from a distance.

Curses the target, inflicting damage depending on the icon, a CC effect depending on the color, and a CC duration depending on the number.

- Mantid corresponds to sizable damage, Sonic ring corresponds to medium damage, and Amber corresponds to low damage.

- Magenta corresponds to Stun, Yellow corresponds to Root, Light Blue corresponds to a 40% slow.

- Numbers correspond to the duration of the effects in seconds.

If the enemy is still under an effect applied by Quantum Space, Arithmetic Curse will overwrite the CC effects but leave the damaging effects at their place.
16
W - Quantum Space
Cooldown: 14s
Medium range

Iyyokuk summons a Quantum Space at the target area. Enemies who step inside the zone will be hit by a damaging effect and a CC effect, depending on the value they've been assigned.

- Mantid: the enemy will get progressively damaged as long as they stand in the Quantum Space area. (Highest damage potential)
Sonic Ring: the enemy will be hit by damage as soon as they step inside the Quantum Space area.
Amber: the enemy is affected by a damage over time effect as soon as they step inside the Quantum Space area.

- Magenta: the enemy is inflicted a 60% slow as soon as they step in the area.
Yellow: the enemy is inflicted a 35% slow as soon as they step in the area.
Light blue: the enemy is inflicted a 20% slow as soon as they step in the area.

- 3s: High damage, 1 second of CC.
2s: Medium damage, 2 seconds of CC.
1s: Low damage, 3 seconds of CC.
17
E - Elaborate Information
Cooldown: 8s
Long range

Iyyokuk targets an enemy Hero and assimilates their values, enhancing his own battle prowess.

- If Iyyokuk assimilates a Mantid, he gets increased damage. If he assimilates a Sonic Ring, he gets Movement Speed. If he assimilates an Amber, he gets Armor.

- If Iyyokuk assimilates Magenta, his benefit will amount to 30%. If he assimilates Yellow, his benefit will amount to 20%. If he assimilates Light Blue, his benefit will amount to 10%.

- If Iyyokuk assimilates a 3, his benefits will last 3.5 seconds. If he assimilates a 2, it'll be 2.5 seconds. If he assimilates a 1, it'll be 1.5 seconds.
18
R1 - Shifting Fluctuations
Cooldown: 90s
Self-cast

For the next 10s, values have inversed chances to appear. Mantid / Magenta / 3s have a 40% chance to appear, while Amber / Light Blue / 1s have a 25% to appear. Sonic Ring / Yellow / 2s appearance rates are unchanged.
19
R2 - Tunneling
Cooldown: 40s
Medium range

Set the values of an enemy Hero to Mantid / Magenta / 3. This effect lasts 6 seconds, after which the values are reshuffled, and while active it is unaffected by Analytic Mind.

As usual, if Iyyokuk loses sight of the Hero, the values are reshuffled.
20
Kaz'tik the Manipulator

Kaz'tik the Manipulator is the Paragons' equivalent of a Siege hero, and a Rexxar-meets-Zag kind of hero. What sets him apart from Rexxar is his greater summoning power, the fact his abilities are all pet-based and he himself is basically just a puppet-master, and the fact his R and D buttons are actually tools to directly control his Kunchong tank(s). Just like Tracer, instead of an ultimate, he gets three very powerful talents that make the Kunchong bugs even more central to his playstyle. The Kunchongs are so important in his playstyle that their leash range is actually centered on them, not Kaz'tik. When playing against Kaz'tik be aware that, while the Kunchongs yield no experience (as they're not considered Heroes, but rather summons) when killed and are surely less tanky than Misha due to the lack of a Mend Pet mechanic, wherever a team of Kunchongs is bashing heads against allied towers there is a Kaz'tik gathering that sweet sweet minions experience somewhere nearby, like a slightly less squishy Abathur who can do nothing but try and run away if caught. Except... he... will send after you an army of giant, hungry, Megamind-headed bugs to defend himself.
21
D - Call Kunchongs
Cooldown: 0.5s
Global range

Send all your Medium-size and Maximum-size Kunchongs to Kaz'tik's location.
22
R - Kunchong, attack!
Cooldown; N/A
Very long range

Command your Maximum-size Kunchong to attack a target. If you issue this command on a location, the Kunchong will first head to that point, then preside over the surrounding area, attacking every hostile target in their sight range.
23
Q - Headbutt
Cooldown: 12s
Medium range

Command your Maximum-size Kunchong(s) to charge a target. If one manages to slam it, it continues traveling with the target, Dazing them until they collide with terrain. At that point, the target is stunned for 1.25 seconds and takes a sizable amount of damage. All nearby Kunchongs are then automatically commanded to attack that target.
24
W - Pheromones Tray
Cooldown: 20s
Global range

Command your Kunchongs to release Pheromones wherever they walk. Pheromones Trays slow enemy Heroes by 30% and lower their Armor by 15%. Units that walk on Pheromones also get 15% increased damage from all Kunchongs.
25
E - Kunchong Eggs
Cooldown: 15s
Short range

Kaz'tik lays a Kunchong Egg at a target location. After 5 seconds, a Pint-size Kunchong will hatch from the egg and push the nearest lane. Eggs will not hatch if there are three Kunchongs on the battlefield already. Maximum 3 unhatched eggs. Any Egg laid after the third one will overwrite the oldest.

Passive: you have mastery over Kunchong bugs. All Kunchongs take 50% reduced damage from non-Heroic sources. There are three kinds of Kunchongs:
- Pint-sized Kunchongs: Pint-sized Kunchongs are outside your control. They will push the lane closest to their hatching point, feeding on enemy minions. After they consumed 7 enemy minions, they turn into Medium-size Kunchongs.
- Medium-size Kunchongs will only answer to commands issued around the lane. Every time an enemy minion dies, they regain 15% of their total health. Medium-size Kunchongs are able to see over terrain. The first Medium-sized Kunchong to consume another 7 minions becomes a Maximum-size Kunchong.
- Maximum-size Kunchongs will answer to any command issued to them. They can kill minions with a single blow, and restore 20% of their health every time a minion dies near them. Max. one Maximum-size Kunchong.

All Medium-size and Maximum-size Kunchongs will mount up and come back to Kaz'tik whenever he's mounted up.
26
1 - Command second Kunchong
Cooldown: N/A
Very long range

Command your first Medium-sized Kunchong, or second Maximum-size Kunchong.

Medium-size Kunchong cannot be commanded to stand guard outside the lanes, and will head to the nearest lane if such an order is issued.
27
2 - Command third Kunchong
Cooldown: N/A
Very long range

Command your second Medium-size Kunchong, or third Maximum-size Kunchong.

Medium-size Kunchong cannot be commanded to stand guard outside the lanes, and will head to the nearest lane if such an order is issued.

The idea is that you use one of the Medium Kunchong to act as a ward when you feel Kaz'tik isn't safe.

Heroic Abilities

1
Xaril the Poisoned Mind

Master of poisons and concoctions, Xaril is actually the only Multiclass-kind of hero among the Paragons, as his Level 1 talents, similar to Karazhim, let him decide whether he wants to play as a healer, a dps, or a hybrid. Xaril is as squishy as a backline healer/DoT mage can get, and is heavily skillshot-dependant, but given enough time he can turn his abilities into either powerful zoning tools, or a safe environment for his team. He is somewhat similar to Gul'dan, Lunara and Malfurion in his toolkit.
2
Q - Blood Infection
Cooldown: 2.5s
Long range

Xaril throws a vial of poison. If the vial impacts an enemy, it deals light damage immediately and applies a damage over time effect that deals moderate damage over 7 seconds. If an enemy already afflicted with poison is struck by another vial, it'll deal moderate damage on impact and refresh the duration of the damage over time effect. If the target is struck by a vial for the third time, they release a Vile Explosion that deals heavy AoE damage in a small area centered on them. Vile Explosion consumes all stacks of Blood Infection.
3
Q - Stimulating Transfusion
Cooldown: 4s
Medium range

Xaril throws a vial of healing mixture. If the vial hits an enemy Hero, the mixture reacts violently, slowing the target by 25% for 2.5 seconds. If the vial impacts a friendly Paragon, it heals for a medium amount over 2 seconds. The concoction will be 25% less effective if the same Hero is hit twice in a row.
4
W - Noxious Vapors
Cooldown: 8s
Medium range

Xaril throws a vial at a target location. When it impacts, it creates a cloud of Noxious Vapors that deals moderate damage and reduces the healing received by enemy Heroes by 10%. If the enemy has an application of Blood Infection, Noxious Vapors will deal slightly heavier damage and reduce the healing by 20%. If the enemy has two applications of Blood Infection, they will take a sizable amount of damage and their healing received will be reduced by 30%. Noxious Vapors last 3 seconds.
5
W - Canned Heat
Cooldown: 10s
Medium range

Xaril throws a vial of Canned Heat at a target location. When the vial impacts the ground, it releases an area-of-effect that heals allied Paragons and increases their movement speed by 25% as long as the remain in the area.
6
E - Switch Concoctions
Cooldown: 10s
Self-cast

Xaril switches between his Healing Concoctions and Offensive Concoctions.
7
E - Incendiary Toxin
Cooldown: 12s
Long range

Xaril throws a vial of Incendiary Toxins. The vial will have no effect whatsoever on the impacted target, but it'll make a Ring of Fire burst from the target after 2 seconds, expanding outwards for a short distance and dealing heavy damage to all enemies hit.
8
E - Eerie Solution
Cooldown: 4s
Long range

Xaril throws a vial of Eerie Solution. When it impacts an enemy, it does nothing at first. If a second vial impacts the same target within 6 seconds, they will be stunned for 1.5 seconds.
9
R1 - Tenderizing Injection
Cooldown: 40s
Medium range

Xaril throws a poisoned dart to a target enemy, slowing them by 50% and dealing moderate damage over 3 seconds. If Xaril has Offensive Concoctions, for the duration of the effect the target takes 75% increased damage from Xaril. If Xaril has Healing Concoctions, the slow is increased to 90%.
10
R2 - Parasitic Chemicals
Cooldown: 60s
Medium range

Xaril infects himself or a targeted allied Paragon with a Parasitic Chemical. The target will be healed for 20% of his health every 1.5 seconds. Parasitic Chemicals only wear off once the target has reached full health.
11
Rik'kal the Dissector

And here's the last one of the Paragons: Rik'kal, a straightforward, resilient melee support whose heals are more powerful when they're aimed at a single target. If you thought by the tenth Hero I lost some of my steam, well... check this out.
12
Q - Virulent Injection
Cooldown: 8s
Medium range

Rik'kal injects a Virus to a friendly Paragon, which after a short delay heals for a heavy amount, split evenly between the target and the Paragons in its immediate proximity. If no other Paragons are close to the injected Hero, the heal is increased by 15%.
13
W - Genetic Modification
Cooldown: 14s
Medium range

Rik'kal unleashes an area-of-effect explosion at a target location, granting allied Paragons Leech for 4 seconds. Rik'kal can also be affected. If only one Paragon is hit, he gains 50% Leech. If two are hit, they gain 25% Leech each. If more than two are hit, they gain 10% Leech each.
14
E - Amber Scorpion
Cooldown: 12s
Medium range

Rik'kal summons an Amber Scorpion to attack a target for 4 seconds, dealing moderate damage. 50% of the damage Rik'kal receives while the Amber Scorpion is alive is redirected to the Amber Scorpion.
15
R1 - Altering Poison
Cooldown: 80s
Self-cast

Rik'kal coats his weapon with a mutagen that lasts 6 seconds. While this is active, each of Rik'kal's Basic Attacks against enemies will deal additional damage over time and Polymorph them for 0.75s.
16
R2 - Mutation
Cooldown: 100s
Medium range

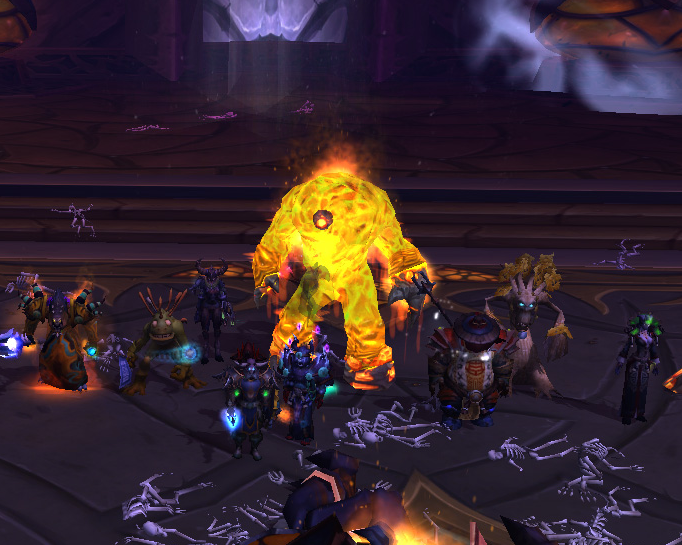
Rik'kal stimulates a mutation on a friendly Paragon, turning him into an amber Mutated Construct. While inside a Construct, the allied Paragon gains a second health bar, gains 25% Armor, and slowly heals. Lasts 10 seconds.

Rik'kal cannot cast Mutation on himself.

Adding a screenshot of a Mutated Construct here because it's cool as s***.

Special Mount

1
Z - Neopteran Wings
All Paragons can fly at standard mount speed with their insect wings.

Your Chapter Title

Quick Comment

You need to log in before commenting.

[-] Collapse All Comments

Sort Comments By
Loading Comments...
Load More Comments

HeroesFire is the place to find the perfect build guide to take your game to the next level. Learn how to play a new hero, or fine tune your favorite HotS hero’s build and strategy.

Copyright © 2019 HeroesFire | All Rights Reserved