THIS GUIDE IS OUTDATED, BUT MANY TIPS ARE STILL VALID, EVERYTHING THAT IS OUTDATED IS MARKED LIKE THAT
>> Content <<

|
|
|
Hey, I'm Derenash, I live in Brazil and started playing HotS in july 2015, always played as flex in the teams I participated, winning the last 2 major South America championships.
I began streaming at the end of september, I got asked by many players to to make a guide about Samuro, that is my most used hero at the moment. Started to like him when I saw it being used competitively by the EU team Diamond skin (current Granit Gaming), and then I spammed him in Hero Leagues and loved it, at the point that we used him many times in Copa America.
In this guide i'll tell you what I learned by playing Sam, how I play Samuro, nothing is absolute truth, feel free to contest anything I say or ask questions in the comments. I'll answer them as soon as I can!
|
|
|
Cons
|
|
- Helps enemies' quests
- Weak early Game
- Vulnerable against AoE damage
- Very hard to play
- Weak against repulsions
- Unreliable early game damage |
|
Besides all his strenghts and utility,
 Samuro has his weaknesses. When side by side with other bruisers he has poor Waveclear and is very dependent on level 7 talents. He is also really dependent on his cooldowns once his copies die, but after much practice they won't die that easily. Samuro has his weaknesses. When side by side with other bruisers he has poor Waveclear and is very dependent on level 7 talents. He is also really dependent on his cooldowns once his copies die, but after much practice they won't die that easily.
|

|
|
|
Towers of doom: A really good map for
Samuro, not only has insane early game in first objective being able to stall theirs while cap yours, but also when you reach 20 he can easily pressure pressure 2 keeps at the same time, making it much harder for others to answer.
|

|
|
|
Sky Temple: This map is phenomenal for Samuro, since its really easy to get value from your insane siege damage and global. Besides that he can also do every temple alone without losing hp and even kick the enemy bruiser out of it because of his insane 1v1 capacity.
|

|
|
|
Cursed Hollow: This is also one of the best
Samuro maps, because his weak early game doesn't affect the objectives, since you can easily not fight for the first one and push another lane instead. The hero can put pressure in 2 different keeps at the same during curse without even being close to dying. If enemies get curse he can easily defend it due to his copies tanking minions while he pressures the hero pushing it. Globals also have a great value in this map making him an even better pick here.
|
 |
|
|
Alterac Valley:
Samuro also stands out a lot in here, because the map is giant, benefiting globals. The objective takes long to be capped, so you can easily splitpush during it as well. You can release the prisoners by yourself using
 Mirror Image to tank the minions while you cap it. Mirror Image to tank the minions while you cap it.
|
|

|
|
|
Battlefield of eternity: Samuro stands out in this map due to his capacity to defend the objective (with the vision provided from the images) while you attack the immortal with your high dps. By using the global provided from
 Illusion Master you can make the whole difference in a game by pushing a lane in case the other is defending their guardian. Illusion Master you can make the whole difference in a game by pushing a lane in case the other is defending their guardian.
|

|
|
|
Braxis Holdout: Again his really biggest weakness is his weak earlygame that can lead to snowballs, not having any waveclear for zerg wave also makes him worse at this map since the solo laner is mostly the hero that defends it. The strong part of the hero in this map is his capability to abuse
Illusion Master to don't let enemies get objective %, all his 1v1 capacity, and the pressure it makes at bot of constantly turning it into a 5v4.
|

|
|
|
Dragon Shire: A big weakness of
Samuro in here is his poor early game, not being able to maintain his shrine before 7 or 10, that is where he gets insane power spikes and can really make the difference in the map. With globals he can easily be a big threat for dragon knight while caps a point.
|

|
|
|
Infernal Shrines: In this map the AoE heroes always stand out, and they're really strong against Samuro, besides he isn't as good as others bruiser are when it comes to doing the objective. Since it's really hard to cap the objective you should push other lane instead of doing it, or trying to get some fast pickoffs to go 5v4 in lategame.
|
|
 |
|
|
Volskaya Foundry: His terrible early really compromises his team, since it is a snowball map (once one team got the advantage it's hard to get it back), but it isn't hard to reach late game in here, so Samuro can be a really decent choice if your team has good robot defense.
|

|
|
|
Tomb of the Spider Queen: In my opinion it is the worse
Samuro map by a wide margin, it's really hard to take value out of global, his lack of waveclear also puts him behind others solos.
|
|

|
|

|
In most of the games
Samuro is a Solo Laner (in the bruiser's place), but he also stands out being the second assassin of a team, since he will be free to siege towers whenever he wants to, as well as it enables him to do any merc without losing experience. Besides all that it also allows team to get a second warrior, making life much easier for ranged assassins like
 Fenix, Fenix,
 Hanzo or Hanzo or
 Raynor giving them a much bigger space in teamfights. Raynor giving them a much bigger space in teamfights.
Besides
Samuro helping oponents to complete their quests, there is also heroes in his team who can benefit from having many heroes in the battlefield, like
 Tyrael with the Tyrael with the
 Law and Order, or Law and Order, or
 Ana with Ana with
 Contact Healing, or even Contact Healing, or even
 Medivh with Medivh with
 Arcane Explosion and Arcane Explosion and
 Circle of Protection, among many others. So the same way the hero is weak against some he is really strong with others. Circle of Protection, among many others. So the same way the hero is weak against some he is really strong with others.
|
Warriors
When it's about warrior in
Samuro's team you want those that can apply slow in backline and dive any killable targets during it.
|
|

|
|
|
|
Besides tyrael not being that strong in current meta he is really good with Sam, since he can apply the needed slow when he wants with
 El'druin's Might, increases a lot of the damage and speed of the orc with El'druin's Might, increases a lot of the damage and speed of the orc with
 Swift Retribution and
Law and Order greatly buffs his effectiveness with the copies. Swift Retribution and
Law and Order greatly buffs his effectiveness with the copies.
Right after him we have
 Diablo, who can apply slows and stuns very easily with Diablo, who can apply slows and stuns very easily with
 Lightning Breath and Lightning Breath and
 Debilitating Flames without advancing and during dive. Debilitating Flames without advancing and during dive.
At third place there is
 Muradin because he can apply slow and advance with you just like others, but can't apply any crowd control without going inside enemy team, limiting your gameplay, since that once inside the enemy team
Samuro can't fallback, or the dwarf will be in trouble. Muradin because he can apply slow and advance with you just like others, but can't apply any crowd control without going inside enemy team, limiting your gameplay, since that once inside the enemy team
Samuro can't fallback, or the dwarf will be in trouble.
|
Suports
Samuro is really good with supports that can offers assistence to his dives from great distances, with heals, damage or crowd control.
|
|

|
|
|
|
 Stukov has a great sinergy with Samuro, considering that his heals reach him easily and he also has great distance slows and roots provided from weighted postule and Stukov has a great sinergy with Samuro, considering that his heals reach him easily and he also has great distance slows and roots provided from weighted postule and
 Virulent Reaction. Virulent Reaction.
 Tyrande is also good with Sam, since he can get healed from any distance once chosen of elune has been cast, and the ccs provided from Tyrande is also good with Sam, since he can get healed from any distance once chosen of elune has been cast, and the ccs provided from
 Lunar Flare, Lunar Flare,
 Starfall and Starfall and
 Harsh Moonlight are great ways to increase his damage with Harsh Moonlight are great ways to increase his damage with
 Merciless Strikes. Merciless Strikes.
 Deckard is another one that stands out because of his long range CCs. Deckard is another one that stands out because of his long range CCs.
 Ancient Blessings also helps a lot with his burst and sustain before entering the enemy team's backline. Ancient Blessings also helps a lot with his burst and sustain before entering the enemy team's backline.
|
Bruisers
When Samuro isn't drafted as solo laner he can be really useful with the solo laners that can find space in teamfight for him to enter into a backline.
|
|

|
|
|
|
Once again
Tyrael is a spotlight, but now as a bruiser, where he can play really freely, since the
Warrior will be the main peeler for the team. The angel can also go for
 Judgment in here, being able to delete any hero with low health pool, since the enemy team have no Judgment in here, being able to delete any hero with low health pool, since the enemy team have no
 Cleanse. Cleanse.
 Imperius Also helps Samuro a lot not only because he has the slow from solarion's flare but because his Imperius Also helps Samuro a lot not only because he has the slow from solarion's flare but because his
 Melting Touch combined with your burst can easily melt through tanks, doing terrible terrible damage in seconds. Melting Touch combined with your burst can easily melt through tanks, doing terrible terrible damage in seconds.
Besides
 Dehaka not being as good as the others in a fight with
Samuro, he can help you with global pressure, and his dive with Dehaka not being as good as the others in a fight with
Samuro, he can help you with global pressure, and his dive with
 Isolation is enough to kill many targets he hit if you are able to attack the hero during the 3 seconds slow. Isolation is enough to kill many targets he hit if you are able to attack the hero during the 3 seconds slow.
|
Assassins
Samuro has no preference with assassins, but there are some who are a little better than others, that are those that can deal direct damage to the backline.
|
|

|
|
|
|
Since
 Li-Ming can ocasionally hit combos into the backline, she is excellent with Sam, because he can finish her targets, creating resets to win the fights. Li-Ming can ocasionally hit combos into the backline, she is excellent with Sam, because he can finish her targets, creating resets to win the fights.
Fenix is also really strong, due to his capacity to deal considerable damage both in the front and backline with arsenal sinergy and
 Purification Salvo, besides having a good slow for
Merciless Strikes with Purification Salvo, besides having a good slow for
Merciless Strikes with
 Plasma Cutter. Plasma Cutter.
 Jaina can't fit all this damage easily in the backline, but the slow from Jaina can't fit all this damage easily in the backline, but the slow from
 Frostbite turns
Samuro into a real monster at 16 together with Frostbite turns
Samuro into a real monster at 16 together with
 Northern Exposure and
Merciless Strikes, dealing enough damage to almost instakill tanks or anything else. water elemental can also slows their backline and pressure then, allowing you to 1shot something like a hanzo. Northern Exposure and
Merciless Strikes, dealing enough damage to almost instakill tanks or anything else. water elemental can also slows their backline and pressure then, allowing you to 1shot something like a hanzo. |
Abathur
|
|
|
|
|
In my opinion, Abathur is the best hero with
Samuro, I honestly dont recall myself losing a game with this duo.
 Symbiote not only intensifies samuro's strenghts as it covers his weakness. The heal granted by Symbiote not only intensifies samuro's strenghts as it covers his weakness. The heal granted by
 Carapace allows him to get any trades in the battlefield without any problems. Once you make the oponent retreat after dealing damage to him with hat, the two can just Q -> Right click a tower and burst it down. And also with Carapace allows him to get any trades in the battlefield without any problems. Once you make the oponent retreat after dealing damage to him with hat, the two can just Q -> Right click a tower and burst it down. And also with
 Adrenal Overload you become a monster in teamfights and siege. Adrenal Overload you become a monster in teamfights and siege.
In maps like
Sky Temple or
Cursed Hollow you can just ignore an objective and take the farthest keep from it with
 Ultimate Evolution. Ultimate Evolution.
The 2 are also insane together because of the combo between
 Envenomed Spikes and
Merciless Strikes. If you reach any hero with no mobility it is dead in less than 3 seconds, as you can see in this clip. Envenomed Spikes and
Merciless Strikes. If you reach any hero with no mobility it is dead in less than 3 seconds, as you can see in this clip.
This combo is even better now since abathur's change, because he doesn't have to get
 Sustained Carapace at 4 and can go for the 25% attack speed, boosting ALL your damage. Sustained Carapace at 4 and can go for the 25% attack speed, boosting ALL your damage.
|

Good Matchups
|
|

|
|
|
|
The easiest enemies to beat are those with low health pool and that have many skillshots, since the clones can absorb then easily, like
 Pulse Bomb, Pulse Bomb,
 Storm Bow, Storm Bow,
 Sleep Dart or Sleep Dart or
 Arcane Orb. Those 4 enemies are really free kills for Samuro. Arcane Orb. Those 4 enemies are really free kills for Samuro.
|
|
|

|
|
|
|
Mirror Image and
 Image Transmission cleanses
Samuro from all poisons and almost every negative status in the game, heroes dependent of those stats in order to deal damage suffer a lot against you. Image Transmission cleanses
Samuro from all poisons and almost every negative status in the game, heroes dependent of those stats in order to deal damage suffer a lot against you.
|
|
|

|
|
|
|
Samuro is really strong against almost every mage in the game, considering you can apply pressure towards them in order to force their long cooldowns on you and having to retreat, splitting the fight in your favor.
Jaina is an exception, because she can damage all 3 samuros at the same time with no problems or counterplay.
|
|
Bad Matchups
|
|

|
|
|
|
A great problem with
Samuro is that every single time he is pushed out by some ability all his commands are canceled and copies attack the closest target or just stay still, doing nothing. So those heroes control him easily.
|
|
|

|
|
|
|
Samuro's gameplay is really affected when he is against enemies with mechanics that can benefit from many heroes, like
 Fire Stomp,
Fan of Knives, Fire Stomp,
Fan of Knives,
 Void Slash or Void Slash or
 Moonfire. But if well played, after level 10 you can split the copies well enough for this to not be that disadvantageous. Moonfire. But if well played, after level 10 you can split the copies well enough for this to not be that disadvantageous.
|
|
|

|
|
|
|
Heroes that are able to disable Sam during his burst with blind, crowd control or even protecting the target really harm your gameplay, but sometimes you can cleanse the blind you get with
Mirror Image or
Image Transmission, giving you a bit of counterplay against those.
|
|

|
|
Mirror Image
(Q)
18s
|
Teleport a short distance in the direction of the mouse cursor, creating 2 Mirror Images for 18 seconds with 100% of Samuro's current Health that Basic Attack enemies for 9 damage. Whenever an Image takes damage, it deals that amount of damage to itself, effectively doubling the damage it takes. Maximum 2 Mirror Images can be active at at time. Using Mirror Image removes most negative effects from Samuro.
In the moment images are created, you have a less than a second window where you can click the right mouse button (or your default move/attack button) in an enemy, forcing the copies to attack it, unless you lose vision of the target or if they're created just over an enemy, and then they'll focus the unit instead.
Obs: If you press Move and attack command (A) instead of Right mouse clicking it you won't need vision, but the images will stop in any minion in the way and you wont be able to attack anything for some seconds, or they'll follow your target - This is really useful sending them to mercenaries like Siege in
Cursed Hollow, to use
Image Transmission and don't lose any soak.
- For both teams it looks like that images has the same life as Sam, but actually they take double the damage (this damage doesn't double some skills like lifesteal, but they do give double the value of damage received skills like
 Empathic Link or
Arcane Explosion). Empathic Link or
Arcane Explosion).
- Using Mirror Image grants Samuro a brief moment of Stasis, allowing him to remove most negative effects (reveal effects like Tracer rounds are not removed) or avoid damage if timed well (which includes abilites like Malthael's Last Rites).
- The images are summoned in 120º of distance between each other and Samuro, having the 2 (red) at Samuro's right and the 3 (blue) at his left.
- If you use
Mirror Image exactly between 2 lanes one copy will go to each one of them.
Until you get
 Mirrored Steel or three way style this ability has the same cooldown as copies's duration. You can watch it to see when copies are going to vanish. Mirrored Steel or three way style this ability has the same cooldown as copies's duration. You can watch it to see when copies are going to vanish.
- Remember this blinks your Hero in the direction of the cursor, so you can use it to run or to dive as well.
- Each copy does around 8% of samuro's damage, so sometimes it's worth to not use them when clearwaving, since you might need it to escape from ganks.
- You can use the small blink from it to pass through some small walls by Qing into their direction, but with some larger walls you can only blink over it with the images, so you have to use
Mirror Image with your cursor in order to spawn a copy in the other side to use
Image Transmission on it. A important example is the wall between the lane and shrine of
Dragon Shire.
|
|
|
 Critical Strike
(W)
10s
|
Samuro's next Basic Attack within 10 seconds will be a Critical Strike, dealing 50% increased damage. This also applies to Images, and does not break Wind Walk.
Passive: Samuro and his Images deal a Critical Strike on every 4th Basic Attack.

- You can see the progression of your critical by the icon over your hero's HP, so you when the sword gets pumped up you can advance into something, AA and then press w to do a double crit combo, this is your main burst. Try to stack the 4th hit everytime you are leaving the lane, dealing 1, 2 or 3 hits in a minion.
- This resets the windup animation of your AA, so its better to use it after one attack, increasing your burst and DPS.
- Activating w also makes the clones' next attack to crit, helping you to complete your quest a lot faster.
- If you don't have Critical Strike ready you can activate the skill up to 7 seconds in advance so that Samuro will be charged and have another W ready few seconds later. Very useful for stacking Way of Illusion earlygame.
- Be warned that activating W you cancel any Bs or mounts that your clones are doing.
- It is completely useless to use your W when your next AA is going to crit due to your passive, it achieves nothing but putting your skill on cooldown.
- If you create images with your W on it doesn't matter the duration of critical strikes, since the copies will never lose their critical until attacking if summoned like that. So if you want to stack in between lanes at someone and has no 4th critical, feel free to use it before spawning them (and if you can, before 6 or 7 seconds of spawning them).
|
|
|
Illusion Master
(R)
8s
|
Mirror Images can be controlled individually or as a group and their damage is increased by 100%.
Passive: Samuro's Basic Attack damage is increased by 10%, and Image Transmission's cooldown is reduced to 8 seconds.
- The UI takes a second or so to update, be careful when doing commands quickly as the game may tell you samuro/image is selected when it isn't. If you have pressed the button to select something your next command will go to that unit even if the UI shows otherwise.
- By using your Left mouse butotn (or your selection button) you can create selection boxes to choose which copies to control, like in Age of mythology and other RTS games.
- In case you want to tell a copy to sit at a fog you have to send them to there and then queue Hold or stop or even dance command with Shift, or they will go to the fog to proceed going somewhere else.
- After level 10,
Samuro gets a insane sustain, due to him being able to hearthstone clones, swap to them and then come back to fight with another swap, like shown in this clip.
obs: While you're inbase your images have instamount without cooldown.
- Number 5 Activates or deactivates the A.I. of your clones, but I have never used this myself, the hero looks clunky with it.
- With
Illusion Master
Samuro is almost immortal to ganks. When they come, you can just split the 3 images, forcing your enemies to kill the 3 heroes or you'll just swap to the one that survived with the less heroes chasing.
- Now you can use your R or D without any concerns in a copy when the other one is dying, in order to heal it to force oponents to waste more cooldowns on the clone.
- Remember you can use your images to delay enemies' rotation by dismounting them and granting vision, or even body blocking some heroes. Getting information about people doing their mercs is also really great, since it allows your team to do anything else in the map.
- Besides your images being able to cast objectives, they can't capture them, but its really worth to choose a copy to cast a objective while you attack the enemy trying to cancel it.
- In Alterac copies can't cap objective, but they can contest it in order to not lose any time or to stall it much longer.
|
Talents changed a lot and the old guide on talents isn't useful, so I'm deleting it all
Early Game
Before the match even starts, during the loading screen, I’d recommend taking a look at the opponent’s draft to see if they have heroes who could finish their quests easily on you, as Zul’jin,
Medivh or Kel’Thuzad. In the case they do have them, you should never go for an early skirmish in the mid lane. If they don’t, you are free to release your copies there to get some early stacks of
 Way of Illusion
 and then go to your lane. If you didn't go with quest, make sure to go straight to your lane to try to get some siege value.
To know which is your lane, you must first check your own team composition to see if your team has a bruiser or solo laner like
Dehaka,
 Blaze
Blaze or
 Sonya
Sonya, beside your tank, you should proceed as follows:
You already have a bruiser: you are free to do what you want, although your main goal is to mess up the enemies' main rotation (for example between mid and bot on infernal shrines, sky temple...) and do mercenaries as they spawn.
You don’t have a bruiser: your role is to solo lane and be apart from your team soaking, being released to make mercenary camps only if/when someone else goes and covers that lane’s soaking.
In the cases you’ll have Way of Illusion, your early game should be focused on finishing your quest. Otherwise just try to get some siege value when enemies are far or do some mercenaries. Keep in mind that if you finish quest by level 7, it’s a 22% damage incrase.
In case the enemy has 5 heroes in the mid lane or showing up elsewhere far from you, you can safely bring a tower to 30% hp on your lane with the correct use of
Mirror Image and
Image Transmission, as you can see
in this clip. Be sure that only one tower is attacking you.
If you can’t see their solo laner, you should wait the wave of minions.
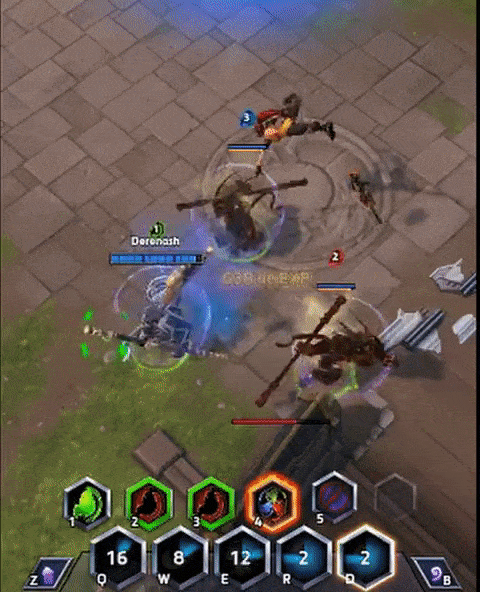
Now, when the waves arrive, you are ready to start stacking your quest. To do so, you can hit 3 times a melee minion and retreat a bit. Then your next Auto Attack (and your illusions’ as well) will be a critical one. When charged, you must see the opponent’s position and react as follows:
1- If he is far from his minion wave (behind, next to or in front of), you want to approach him with your E or mounted and then create your images with your cursor on the opposite direction of where he is, making them spawn within AA range of their target. Right after the first AA crit, use your W to secure one more crit for each illusion. If he proceeds to trade damage with your illusions, you can use Image Transmission to heal them and get some more free stacks.
2- If he is in the middle of his minion wave, you can’t use
Mirror Image like described or they will just target minions and provide no stacks. Take a distance from and use Q while you hold your attack key over him so that copies ignore the minion wave and go straight to the enemy hero.
3- If he is on max distance just to soak without clearing the wave, you can use your E through the wave to apporach him and then proceed as the first case. If he retreats before you reach him, you should try to zone him out of soaking range.
In this clip you can see the first 2 scenarios applied on Arthas, achieving 18 stacks in 1 minute.
If you didn't go for quest, try to play the lane phase by poking the enemy with double critical and blinking out.
You'll lose many matchups, so if you don't feel like winning, don't try to face the enemy, but freeze the lane by spawning clones when their minions are close to your towers, so he can't clear your wave safely.
Most frequently you won’t want to group up for the first objective as you still lack your level 7 power spike. Also, the first objective is always the weakest one. You’ll have to decide how you’re gonna split push: either going straight to their tower and using copies to tank (when you know they’ll come soon to defend) or clearing the wave to push right after (when you know they’ll be late to defend).
If the map is
Cursed Hollow or
Sky Temple and you’re the one supposed to do mercenary camps, remember to call someone to replace you in the soaking and make them on spawn.
Observation: you can solo the bruiser camp without losing HP by making each copy tank 2 merc unities, then use
Image Transmission to heal them when needed.
Once level 7, Samuro wins the trade against almost any hero and has his value on team fights. By now you can play more aggressively, doing 40% of many heroes’ HP pool with your Auto Attack crit + W combo. Also, it’s now even better to go straight to towers because you can break them with one rotation.
Mid Game
After level 10 your hero becomes a lot stronger because you not only have a reduced cooldown on
Image Transmission, but also you are a global hero now since you can control your copies.
|
|
 |
You don’t want to stick to your team until a fight comes up. Go to the opposite lane and push it while sending a mounted copy to your team so you have a fast way to reach them in case something happens.
Since you’re global, you want to siege every time it’s possible. To do so you should send an image to lanes without enemies and bring down both their towers, or even a fort or keep if unanswered. Remember to abuse your hability to heal your copies as they are necessary to soak structures’ shots.
Keep in mind you should only siege if you know no one is coming soon to harass you, as using Q+R to siege leaves you very vulnerable to ganks.
|
With level 13 it becomes a bit easier to fight and escape ganks with
 Shukuchi
 and
Mirrored Steel, allowing more aggresion.
´
Level 16 is your second biggest power spike. With
 Harsh Winds, try to attack enemies that are split from their team, dueling around the map is also a good idea. Do not hesitate to hit their tank if he’s split scouting as your burst is considerable even for a tank.
If you have press the attack it is useful to build stacks on the enemy frontline before swapping to an image on the backline, allowing you to have the 40% attackspeed increase ready to burst them down.
If you chose
Merciless Strikes, focus on playing more with your team and hitting whoever is slowed or on other crowd controls. Pay attention to slows that are easily applied on their back line, like
Fire Stomp with
Debilitating Flames specced, or a Water Elemental, because as mentioned before, you can kill a ranged hero with 3 or 4 attacks.
Late Game
Once you reach level 20, in my opinion Samuro is the best late game hero by far. You have now insane macro and very strong fighting capabilities as your images are tough and hard to kill.
Now your main focus is pressuring their keeps and then their core while sending copies to your team to secure yourself an escape route and being avaiable to come to team fights if needed. Basically you want to use your illusions on the structure and move your tanking illusion out. The keep/core will now target the other illusion while you are safely sieging.
In case someone retreats to defend your push, you can blink to the illusion near your team and make it a 5v4 in your advantage or just siege and retreat to safety. If you see an opening to end the game right there, go ahead and keep using Image Transmission whenever enemy heroes are targeting the real samuro so you don’t get damaged.
Defending Stacked Waves
If enemy minion waves stack too much in a lane, you can make copies to tank them as they approach your gate, preventing them from sieging your base. Again, as Image Transmission heals your copies you should abuse it while your towers take down minions.
Example
Breaking Keep’s Towers
If you have Abathur on your team and the enemy has no globals or high mobility heroes, like Tracer and Genji, and if you are not the solo laner on your composition, you use your early game to try and take down a keep’s front wall. Priorize their solo’s lane (the top lane on
Battlefield Of Eternity, for example) so that in case they try to harass you, they’ll have to rotate a long way to do só. If their solo laner try to answer your push himself, he’ll lose soak and not secure your death.
If you manage to take their tower, you’ll earn 400 experience for your team and enable a much stronger push in the late game against that front wall, while each death you suffer earns only 300 to 400 experience to the enemy team until level 3(This was much more effective before the experience changes in december 2018, but in some situations it is still a good tactic, since it really draws your enemies' atentions.
Example¹
Example² - with Abathur
Tilting Towers
Towers and forts/keeps always priorize clones or minions other than Samuro, and they take time to focus when acquiring a new target. So, if you move into their range and leave quickly, you can make them not shoot anything while you siege it.
The higher the angle the tower has to cover between old and new target, the more time they take to focus before shooting, making it easier to execute this trick. If you are new to this, try to put the illusion on the opposite side of the keep.
Example
Blinking and Leaving Copies Behind
After getting
 Three Blade Style or
Mirrored Steel, the duration of your copies will be longer than the cooldown of
Mirror Image, allowing you to make this trick.
Three Blade Style or
Mirrored Steel, the duration of your copies will be longer than the cooldown of
Mirror Image, allowing you to make this trick.
When queueing commands as Samuro, like moving and then holding shift and clicking Q → R, you’ll switch with the selected copy as soon as the movement finishes and leave 2 copies where you were. Keep in mind that the blink command must be done with your cursor over the copy you wanna switch to, since queueing up commands does not work between two different unities.
This mechanic can be pretty useful when you want to go back to your base to heal after level 20 in case you have a dead illusion and it also messes up with your opponents.
Example
Going Through Gates
The only way to go through a gate as Samuro and an image is by creating copies with your cursor behind the enemy tower while hugging their gate, making Samuro to spawn inside the gate and one copy over their side.
Example
Controlling Images Prior to Level 10
When making copies you can use the A-move comand and they will move in that direction and attack anything in that path. But, if you make this command over a wall, they will never reach that point and, instead, will stand still, providing you vision or even dismounting enemy heroes that pass by.
Example
Protecting Hearthing Image
When you swap with a clone, the one you didn't swap with gets the same stasis iframe and has it's hp refreshed. Since technically the clone you didn't swap with isn't using an ability it will not interupt channelled actions like hearthstone. You can use this to protect your hearthstoning clone if you want to make sure it gets to base safely.
Example
Special Thanks
VoidInsanity: main Samuro who has over 1.500 games with him. He clarified many doubts I had, allowed me to use his
collection of Samuro’s gifs in this guide, and even made some additional ones that I asked him. Also he is the one who discovered many of the mechanics I explained through this guide. And besides all that Void helped me a lot with making this guide, editing it and even correcting some spelling mistakes. He's always willing to help anyone who have doubts about this hero. You may reach him by
his twitch.
Wind Striders: Discord created by many Samuro players from all around the world to teach and spread knowledge about the hero or just chat, all communication here is made in english and everyone is welcome.
Munky: Grandmaster level 300 with Samuro in Europe, taught me all Samuro’s basics on
his stream.
Members of Wind Striders: Helped me not only with samuro stuff but also with english, math and formating of the guide.
betoGG: Helped me discovering what a Samuro must do in the competitive environment (Latin America).
Raphenz: A big friend, translated half of the guide for me and adjusted the other part, since i'm not really good at english. ):
Blackstorm: Another main Samuro from SA, did a
sweet guide about Sam as well, worth to check, since it has a part about matchups that could be really good.


Quick Comment () View Comments
You need to log in before commenting.