Table of Contents Top
Introduction Top
I enjoy playing heroes who are also good at clearing mercs when they're not busy helping their team or pushing a lane. While Zagara can do this, what is really nice about her is that she can do it in a build that makes almost no sacrifices in the damage she can put out in duels or team fights.
Zagara can also be a lane pusher, even without mercs. Even without
 Demolitionist
 her roaches, hydras and even banelings suck up ammo. Combined with her crazy damage she could quickly tear down towers and a fort if left alone. She can usually dominate a lane early game. Hydras can bully away anyone in an even fight.
That said, I find solo push to be a bad strategy against good teams after the very early game. They
will punish you mid- to late-game for being alone on their side of the map. And without you, your team is likely to lose in 4v5s, putting your team way behind. So her pushing power is mainly an early game thing. Even in the early game, only be on the enemy's half of the map if you know for sure where all the enemy heroes are and that they're not going to gank you. Still, now that you get XP from towers, taking out a tower or two in the early game can get your team a level lead. You just don't have to be near their towers to get that done.
Luckily Zagara has talents which can put out as much / more hero damage than most assassins that also lets her push a lane and quickly clear merc camps.
Pros/Cons Top
Pros
- Vision, objective and map awareness for team via creep
- One of the strongest lane bullies, especially in the early game
- An excellent heroic which can interrupt heroics and swing team fights
- Damage on par with assassins from a decent range
- High sustain, especially with
 Rapid Incubation
- Minions suck up ammo, making her very strong at pushing when left alone
- Solo merc camps fast while taking very little/no damage
- Quick movement while on creep
Cons
- Low health, dies quickly
- No escape moves until level 20
- Mana can be an issue if just spam your abilities (especially hunter) or take any other talent at level 7
- Lack of CC and burst can make it hard to kill people alone
Abilities Top
Auto Attack
Zagara's auto attack does a lot of damage, especially with its fast cooldown. Level 4 talents make this an important part of her damage.
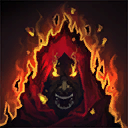
 Baneling Barrage
(Q)
High damage move with splash. Easy to dodge if cast from a good distance. Can actually soak a few shots from towers. This move can be mana-intensive. Before you get
Rapid Incubation, consider not using this move outside of team fights unless you're sure you'll have enough mana to stay in your lane and for the next team fight.
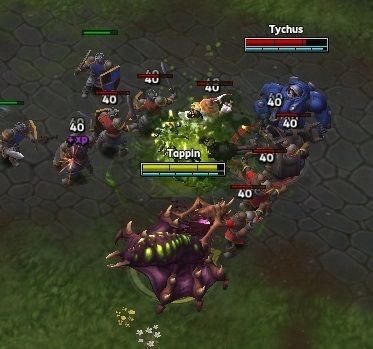
When you do this move on mercs or minions, make sure to cast this in a way that maximizes the number of targets taking splash. See the image below and tips for using these on certain merc camps.
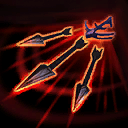
 Hunter Killer
 (W)
This is your highest single target ability. Use it to kill or scare away heroes. If heroes do not run from this or kill it immediately, they will take a
lot of damage. Don't waste this on minions. Instead use to to push away heroes, denying them experience and keeping you safe.
In a team fight, choose your target wisely. Even your own
 Devouring Maw
 stops the hunter. If you can get range on them, healers are often a good choice. They may have to run, setting up a kill on someone else. If they don't run, they'll take a lot of damage and usually don't have enough damage themselves to stop the hunter. Don't overextend to target a healer, though. Anyone who is likely to be slowed, stunned or rooted also means extra damage.
Try not to use this move when your enemy is near a tower, as they will just run behind the tower and the hunter will be wasted. It also does a lot less damage (or none at all) on heroes with high mobility or heroes who can easily teleport and vanish.
 Infested Drop
 (E)
Splash damage followed by roaches. The roaches do decent damage. They soak a huge volume of tower ammo, which is especially important in the early game. The initial impact is good for clearing enemy Zagara creeps: just aim for the center of any patch that doesn't have a visible (your) creep tumor. Also a good idea to target Gazlowe's turrets with this.
 Creep Tumor
 (D)
The obvious benefits are that this lets you run faster and regenerate health quicker. The regen portion was
buffed in the December patch, especially if you take reconstituion. It's important to give yourself an escape path with creep. But creep's most important power is actually neither of these.
As with most games of this style, vision is very important. Zagara can provide vision at most objectives, high-traffic choke points, etc. If you're aggressive with your creep, your team will usually know where at least half of the other team is at all times.
In the lane phase, be sure to never place your creep in the center of the lane. It will die to incidental AE on minions. Instead place them on the bottom or top of the lanes. Try to place them in high traffic lanes or gank opportunity points. Do place one near your tower to make sure you can escape, just not in the center of the lane. If possible set a tumor near each boss. Don't overextend solo and get ganked to place them, though.
When arriving at an objective or team-fight location, be sure to drop a tumor or two to give yourself more mobility, regeneration, and to provide future vision of that location.
Talents Top
My default is
 Reconstitution
. It provides value the whole game. It gives you more sustain early, before you get
Rapid Incubation and, if you're conservative with hunters early on can avoid having to hearth before the first objectives.
Demolitionist and
 Corpse Feeders
 are both OK depending on the situation.
Demolitionist only seems good if your team is going to help push your lane early. With 3 people in your lane, you should be able to get shots on a tower and remove ammo. If it's just you in the lane, you'll probably dominate the lane with hunters, but getting close to the tower is asking to be ganked (and you have no escapes at that level).
Corpse Feeders lets you push a lane harder without getting to the wall. It effectively soaks up about as much ammo as
Demolitionist but can help on minions as well. If you don't like
Reconstitution and don't know that you're going to have a strong push in your lane, I'd take this. But both of the pushing talents provide 0 benefit in a team fight.
Reconstitution at least makes sure you show up to team fights at full health.
Reconstitution
I find mana to be a bigger problem than health, especially with a healer on my team. But this does provide a lot of sustain. I passed on this until it was pointed out that it stacks with well regen and
Rapid Incubation. But in my testing, that does
not seem to be true. Still, combined with health globes and wells, this talent keeps you high health and usually lets you push a lane to the wall, which lets your minions suck up all of the ammo on towers with or without
Demolitionist.
December's health regen on creep buff makes this talent a lot better. With this on creep you regenerate 6 every second at level 1, 24 every second at level 15. Without the talent those numbers are 3 and 12 per second.
Corpse Feeders
This used to make roaches last longer, which was useful in both pushing and team fight. Still, they often died before their timers expired. But now they just take less damage from mercs, minions and towers. This can help you push a lane better. For pushing towers this can effectively soak about as much ammo as
Demolitionist: getting more minions to the walls and eating more shots on the roaches before they die. And it can do that without overextended to near the enemy's towers. It can also help you merc better, which means you take almost no damage against most camps.
Sadly it provides 0 benefit in team fights.

Other Talents
Demolitionist
Now that towers give some XP and you don't have to push all the way to a fort to get benefit from bullying a lane, this talent has more value. I find it only useful in the early game as tower and keep damage matters less later, when heroes can soak building damage easily. Zagara can solo towers and forts without this by sucking up ammo with her minions. It does help you get towers out of ammo quicker. But with the newly nerfed tower ammo regen rates, once the towers are out of ammo, the ammo reduction portion of this talent starts to provide less benefit.
I see pros taking it, but when I watch how how many hits they get, they don't usually get that many auto attacks against towers and by the time they do, the towers are often out of ammo anyway from minions and Zagara minions. I have seen a few teams get value from it when they devote more heroes to Zagara's lane, though. That lets her get to towers faster and sometimes lets them get a tower or two down and a nice XP lead, which can snowball once objectives start.
 Centrifugal Hooks
Extra range on banelings. I tried this for a while, but found it to be pretty bad. You don't need the range vs. towers since your roaches can soak. Against heroes, you usually don't want to cast from far range and it gives them time to avoid. Against minions and mercs, you're actually better being close. This probably gets a bit of a bump if your opponents include a
 Sgt. Hammer
.
 Envenomed Spines
Extra range for safety + poison DOT. The poison adds up. Staying away from enemy heroes is a big deal. Works against all targets. Note that if you alternate targets each hit on minions / mercs, you can actually get almost as much damage as Medusa by stacking many DOTs. Poking at range with this and
Hunter Killer means enemy heroes will have a hard time stayin in XP range during the lane phase.
Other Talents
 Medusa Blades
Gives you up to 175% of your auto attack damage if you have 4 targets in range. But you don't always have even 2 or 3 in range. In a duel you would rather have either poison attack. Even in a team fight, you often only have 1-2 people in your range. Does some crazy things with
 Fury of the Storm
 at 20, but you need
 Bolt of the Storm
 to stay alive. (If you didn't need an escape, it's probably because the other team was bad or way behind, in which case
Fury of the Storm is just a 'win more' talent.) Stacks with attack speed buffs like
 Bloodlust
 or
 Inspire
.
 Envenom
Now that this does its damage at half the rate, I think it's always inferior to Envenomed. It does damage quicker than Envenomed, but you lose the range, it's less damage overall, and it has 0 benefit against minions, mercs or towers.
 Infest
This was worse than other talents but still fun to play with before the December patch. It wasn't as good as the other talents, but it was fun to throw it on a high DPS minion (archer, catapult) just before leaving or while passing by a lane to go to an objective. They could do damage to a lane long after you left, especially if the opponents get stalled at the objective. But now that it only lasts 15 seconds, it's simply bad. With a 15 second duration, even just for pushing, it's less damage than other talents on this tier. And meanwhile those talents help with hero fights while this one provides zero damage outside of lanes.
 Tumor Clutch
As important as creep is, it doesn't cost that much now and there just isn't enough time to drop even more of them without just stacking them up. Plus the other talents in this tier are so much better.
Rapid Incubation
Amazing talent. Most games I don't ever have to hearth, which means more XP and push power for your team. The more important part is the extra mana as without this talent you'll often find yourself mana starved. If you use the talent often, you should not have mana problems, especially with wise use of your hunter killers.
Loses some value if your team has a solid healer and the game is mostly team engagements since you'll probably be high health or dead. So this has a lot more value in solo queue than organized play. But it's still really solid even with a good team.
Against a merc camp, use it just after you finish the pack, while you're waiting for the cap and you'll end most camps full health and with about the same mana as you began.
The talent helps you show up at team fights with more health and mana. Don't be afraid to use this during a team fight if you're below half health, preferably in the back of the pack. If you've already laid out your Q,W and E, you're doing most of your potential damage anyway and only losing your auto-attack damage as a trade for becoming a lower priority target. You're far more likely to contribute a large amount of damage in a team fight if you're near 100% health.
Clicking a well and using this move can nearly fully replenish your health and get a huge chunk of mana from any level.
Other Talents
 Endless Creep
More creep is nice, but I like always being full health and never running out of mana. Has a lot more value if you play on an organized team who can take advantage of the extra vision. Makes it more difficult for the enemy team to identify the center of your creep spots. Really good teams like this talent on maps with lots of vision blockers and gank points or obscured objectives like
 Sky Temple
 or
 Tomb of the Spider Queen
. Loses a lot of value against
 Tassadar
 or any heroes which do a lot of incidental AE damage such as
 Arthas
, a
 Valla
Valla with a
 Multishot
 build, or any hero likely to take
 Burning Rage
.
 Battle Momentum
An interesting choice, especially considering Zagara's fast attack. Without
Rapid Incubation I have mana problems even without being able to spam abilities faster, so I would probably only really take advantage of this if I made repeated trips home. That could be facilitated with Nydus, though? I did see a pro game recently where a
 Malfurion
 went with
 Innervate
 talents and fed Zagara huge amounts of mana. That would make this a great choice, but it seems very rare and niche. Would make
Devouring Maw available more often, but it's usually already ready for each big team fight unless you used it during a false start team fight. Not my first choice, but I could see experimenting with it more.
 Ventral Sacs
Was a clear choice at level 1. At level 7, it's a lot less powerful. They soak ammo, but you shouldn't be doing much solo siege by this point. The damage during mercs is also nice. If I were willing to give up my choice on this level, I'd probably take this and swap level 1 to
Corpse Feeders.
 Volatile Acid
I don't like it. Extra non-heroic damage is overkill on minions, not really important on mercs, pretty nice for buildings, and the talent does zero damage in a team fight.
See heroic ability section. Both have their moments to shine, though Maw tends to win out most of the time.
February's patch made this tier a lot closer. See below for details.
 Mutalisk
This lets your hunter/killer chase people longer, farther, and even outrun them around some terrain.
And it does more damage overall than
 Grooved Spines
 against multiple targets, which makes it good on maps with tight chokes. This makes it a lot better to pick against
 The Lost Vikings
 or a melee-heavy team, since you'll almost always have multiple targets in a team fight.
This also gets a bump on maps where the mutas will have an easier time chasing around corners, such as the
Tomb of the Spider Queen or
 Battlefield Of Eternity
.
This helps slightly against clearing merc camps, though Zagara can clear any merc camp easier with either talent here.
Grooved Spines
The extra range lets you contribute in a team fight from a little farther. Works well with the extra range from
 Envenomed Spines
 to make sure you don't have to get in range of any enemy heroes. The extra damage is scary, especially once you get double hunters. Take this if the enemy team has mostly ranged dps which are hard to reach or you feel you need the range to stay alive.
Other Talents
 Giant Killer
Sometimes I take this one, mainly when the other team has 3 high-health heroes or I find myself only able to reach
 E.T.C.
,
 Diablo
,
 Chen
Chen,
 Stitches
 with his level 1 hp talent, etc. safely. It can make a really big difference in tank duels or team fights where you can't reach the squishy targets. It's especially good against "1.5 tank" comps with a dive tank like
 Sonya
Sonya or
 Tyrael
. Your team can just blow up the squishier tank if they dive, especially if others on your team took
 Blood for Blood
, which is also better against high-health heroes. This talent also gets better with abilities that increase your attack speed like
Bloodlust,
 Rockstar
 or
Inspire.
Remember that
 Azmodan
 and
 Uther
Uther also have very high health pools. So any team with Azmo or Uther + 1 or 2 other tanks makes this a strong choice. A team with 2 tanks (even if one of them is a dive tank) plus
Uther or
Azmodan should probably be a 100% pick for this talent.
 Spell Shield
Pretty good against heavy spell poke like
 Kael'thas
,
 Jaina
Jaina,
Azmodan dunk build or a few other heroes when they stray away from auto attack builds. Hopefully you're usually in the back and your team isn't getting flanked. Even when I've thought this would save me, extra range from
Grooved Spines and playing very cautious and out of range seems to be the better call.
 Bile Drop
Extra damage is nice, especially on merc camps. But it's too easy for heroes to avoid and
Giant Killer /
Grooved Spines are just a lot scarier in duels and team fights.
 Brood Expansion
Amazing. Double hunters just plain kills people if they don't run. Great synergy with either Mutalisks or Grooved Spines. It's also nice on merc camps. It's especially useful if you find yourself soloing a golem as it gives you one more soaker (don't cast them together vs. a golem if you're solo.)
Other Talents
 Stoneskin
Not my first choice, but sometimes the other team just has your number. Can help you live from those scary Tyreal or Anub stun + focus onslaughts. If you've been blown up most team fights before you can do good damage, this +
Rapid Incubation is probably your only way to live until you get
Bolt of the Storm.
 Baneling Massacre
A scary amount of damage if they all hit. And they will all hit if you're jumped. But hopefully you're at long range, at which point people may dodge them. Also remember that you are rooted for the entire cast. I don't even think you can cancel it like other channeled moves?
 Metabolic Boost
Way too late in the game for this talent and doesn't hold a candle to the others on this tier.
Bolt of the Storm
So good at keeping you alive. When the enemy jumps you, teleport away, preferably through a wall, and heal up with
Rapid Incubation. Then you can start adding damage from afar again. Also useful for tracking down a runner and getting a poison dot on them, though you shouldn't use this offensively unless you know you won't need it soon.
Other Talents
Fury of the Storm
February changes made this a burst talent for single or multiple targets. It used to be a sustained damage increase against groups only. This talent is a lot better than it used to be.
This has always worked with
Medusa Blades. In my testing, attacking a target with other targets nearby means all 3 targets take an extra 200 or 400 damage. It's hard to tell because the floating combat text only shows one number when 2 events with the same number happen at exactly the same time. This makes for a really nice spike on your primary target
if there are other targets in range, a 700-900 hit at the beginning of the fight and every 5 seconds after. If you prefer Medusa, this might be worth taking. You'll probably die but maybe the damage will make for a fair trade or better.
In testing at level 16, attacking a tower with 2 nearby walls took:
15 shots with Medusa and Fury
17 shots with Medusa without Fury
13 Shots with Envenomed Spines and Fury
15 shots with Envenomed Springs without Fury
So it does add burst. It adds a lot of damage overall, especially for pushing and clearing minions. But the total number of hits it takes to kill a single target with other targets nearby is still about the same for
Envenomed Spines vs.
Medusa Blades plus
Fury of the Storm. If you can only reach one target,
Envenomed Spines is more damage than Medusa even with Fury.
Personally I'd still rather have
Envenomed Spines plus
Bolt of the Storm. Extra range keeps you out of danger range and Bolt frequently saves your life.
 Tyrant Maw
Not as good as Bolt. The power of this move is not about the damage and the damage isn't that great with or without this talent. The reduced cooldown probably isn't that important at this point. If your Maw kills people at level 20+, it's often followed by a team kill and a push for the win before the cooldown will matter much again.
 Broodling Nest
I want to like this one. When Nydus makes sense and it pans out, I am using them a lot. But the broodlings just aren't that strong, team fights are too frequent, and having another way to avoid getting killed in a team fight is a lot more important.
Heroic Abilities Top
Nydus can be very strong, especially on big maps. That said, Nydus is better in solo queues and at low rankings and loses its value as you get into higher level, more team fight focused play. The new global range on Nydus will have me trying it out again. It leads to some neat tricks like sniping a foward fort, keep or merc camp and getting out before they know you're there. Probably works great combined with
 Abathur
. It's probably still going to always lose to
Devouring Maw at higher levels of play due to the game's dependence on winning hero fights at late levels.
Devouring Maw
The ability grabs your opponents after a short delay, causing fairly minor damage, but taking some or all of the opponents out of the action. Interrupts most channeled heroic abilities. After a grab, press E if it's available to drop roaches on them as they come out and then Q to time a nice, unavoidable baneling hit. If your team has scary AE moves, they should hit them just as this ends.
It's nice to get the whole enemy team in there, but sometimes it's actually better to get 3-4 people in the back, leaving just 1 to face your entire team.
Also crucial as an ultimate stopper, especially against certain abilities like
 Ravenous Spirit
,
 Strafe
,
 Triple Tap
, etc. Save it until the other team is mostly clumped or they unload some channeled heroic abilities.
Be careful of the anti-combo. If your team has high-damage heroic moves, you can actually defend the enemy team by swallowing them. If possible, talk to your team so you know whether they expect you or them to drop a heroic ability first.
This move can also be used as an escape move.
 Nydus Network
When the opponents don't force team fights constantly, Nydus can be very fun and effective to play, letting you clear mercs in many places and push multiple lanes at once.
With Nydus, Zagara can be anywhere (usually on your half of the map) very quickly. With Nyduses already positioned, she can actually grab a full round of mercs faster than even Gazlowe (though she doesn't get Merc Lord). This also allows her to get full health/mana at almost any time by hearthing and taking a nydus immediately back into the action. That last perk is a lot less necessary if you took Incubation, though.
Place these in hidden locations: bushes, hedges, etc. Good opponents will kill these immediately if they see them. Be careful putting them in dead-ends. The pathing can be bad and it's possible you will always exit on the wrong side of your nydus and trapped, even when you're clicking on the open side. Also note that this can be a pain for the enemy if placed in bushes at choke points. This is especially true on the lower DK shrine. They may not be able to path around it at all. The enemy may have to waste an AE move just to be able to target the Nydus to clear it out of the way.
I don't know if this is intentional, but Mercs will also attack this. It's not needed in most merc fights, but if you find yourself almost dead against a merc camp, drop this and move so that it's closer to the mercs.
Not that this move has a long range. You can actually use it in the middle of a battle to block a runner or block people (or banelings) from coming in.
The way this move works is not obvious. You can only have 4 on the map at a time. When you cast a 5th, the oldest one will disappear. You can't choose which one to remove.
Choosing
As I said, as you get to more advanced players and organized teams, Maw is probably always better. Team fights will be more often. Even if team fights don't happen until later in the game, a single team fight level 20+ can win you the game, even if you were behind. So every bit of team fight power becomes important. And if you're on a composed team, they will probably have given some thought to talents that provide synergy, and Nydus really can't do that.
If you're in serious team play and you're not doing some crazy back door strategy, nydus probably isn't going to be as valuable as Maw. At lower levels of play Nydus can be fun. It also
might be good on really big maps like Garden.
If you're still considering it, things that went into my decision included:
- How many team fights do I expect to be in?
- How often do I expect to be able to merc solo?
- Does my team have someone with Merc Lord that makes them a better choice for mercing alone when that's an option?
- How big is the map and how important is it to be able to get from one side to another quickly?
- Does my team have synergy with Maw?
Looking at the maps:
- Mines - The map is small, so Nydus isn't as valuable. They did just fix this in October so that you can Nydus from the top into the mines. Still, I usually take Maw on this map even though other maps have more team fights.
- Cursed Hollow - This map has many, guaranteed team fights. Maw is pretty much automatic for me on this map.
- DK Shrines - Nydus is pretty good on this map. Being able to very quickly swap from either shrine or mid for the cap is nice. There are lots of mercs that also make Nydus nice.
- Blackheart Bay - This map is pretty big and being mobile can provide a lot of coins. By level 10 I usually have a good idea how often serious team fights over the turn in will occur. This maps can also snowball pretty easy: getting a bunch of mercs and a few coin turn ins early can put your opponents behind in both forts and levels. If I feel I'll be able to collect coins solo freely, and big team fights at the pirate might not be common, I'll probably take Nydus. But if it's a constant brawl, I'll get Maw.
- Garden - I don't know about this one yet. The map is huge which makes Nydus more attractive. And there are plenty of merc camps to take. The current meta seems to be to never go for a horror unless the other team is missing a few players, to avoid the counter-gank. So team fights sometimes don't happen until late.
Looking at the enemies:
- If there are a lot of melee, Maw becomes more valuable
- If the enemies have a lot of channeled heroic abilities, Maw becomes more valuable
Looking at my team, Maw gets strong with certain combos:
- Kerrigan can grab people into my Maw, setting up a nasty combo when they come out, especially with Maelstrom + another pull when they come out.
- Maw properly timed with Gazlowe's wombo-combo, Nazeebo's spirits and several other heroics can be devastaing
- Maw can be used defensively to stop people from killing Hammer in a "Protect the Hammer" build.
- ETC can get on top of the Maw with Mosh pit and make for a really long disable.
- I don't know if this was fixed, but Diablo was able to hurt people with his ultimate even in the Maw
Strategy Top
Laning
Unless you're making a serious push at a tower / fort, be conservative with mana. It's too easy to unload most of your mana well before that. Use mana to push other heroes away, but don't overkill minions. Remember that you get full XP as long as you're close, whether you actually did any damage to the minions or not. And while it feels good to get a lot of damage on a couple of towers, the real damage to the enemy doesn't happen unless you finish a tower and get the exp from it. So having mana for the first team fight is important. Until you get
Rapid Incubation you can't afford the big run home, especially on big maps. A nice tip 1v1 in lane is to use your
Hunter Killer just as the middle minion drops an orb, making it difficult/a bad idea for your opponent to stop you from grabbing the orb.
As mentioned before, a well-placed, properly-angled baneling hit which splashes on all 7 minions is enough to nearly clear a minion wave alone. That makes roaches + banelings overkill unless there's also an enemy hero around. A properly placed
Baneling Barrage can do triple or more damage compared to a bad horizontal shot on just 1-2 minions. You do need to be careful that you're not overextending getting that angle, though. Only try that if you know where every enemy hero is on the map and you won't get ganked mid-lane. If you're not sure, just use roaches and dps from safe range and save your baneling mana.
Speaking of enemy heroes, try to force them out of experience range with a combination of hunters and the extra range of envenomed spines.
Mercs
- Giants - Roaches take most of the damage. Use banelings between the two to hit both. Use a hunter on one. Concentrate most of your damage on the same one to kill it quick (reducing damage), but keep your Envenomed Spines dot ticking on the other.
- Bruisers- Try to get in the middle of them before you start (can be hard to find the spot to click without actually attacking one, but you'll see the white cursor). Use banelings from the center to hit all of them. Drop roaches to tank. Put a hunter on the caster. Spread the envenomed dot on all of them, but focus most of your damage on the caster until he's dead. Use your other moves on cooldown.
- Golem - It's possible for Zagara to solo golems, but it's almost always a horrible idea. Remember that a single AE can wipe all your minions so, unless your whole team is there exploding the golem, avoid having your roaches and both hunter killers up at the same time. Use roaches right after a stomp. This lets them tank for you for a longer period of time.
In all 3 cases, drop creep at the beginning for extra regen and future vision, preferably on the side of your escape path. Use
Rapid Incubation as soon as the fight's done while you're capping, to recoup mana and any lost health.
Don't try to solo forward merc camps unless the other team is dead or you know it's safe because you have vision of the enemy heroes.
Team fights
Your job is to stay alive, letting your minions and long range on auto attacks provide damage from safety. Try to have creep near the back in case you need to run or to boost your health regen. Make sure banelings will hit something and you're not so far that the enemies can move to the sides easily.
As always, prioritize non-tanks, preferably non-evasive squishies first. Try to kill the same thing your team is killing. However, your first job is to stay alive. Others may do more burst, but very few heroes pump out as much overall damage as Zagara (Hammer, Jaina and KT come to mind.) So don't get too close to the enemies and avoid chasing if it puts you near the front.
If the enemies have Stitches, be very careful to keep a team mate or your roaches in between you and him. You move too slow and have no escape moves, so getting grabbed and/or eaten is probably the end for you.
You sometimes need to move in, drop a few abilities, and move back to max range. When you get in that close, try to make sure your hunters are on a priority target. If you took envenom instead of spines, try to use that on someone already well on the way to dying.
While spreading the spines dot is nice on minions and mercs, it's usually better to focus and kill a hero in a team fight.
Once you've used your abilities, don't be afraid to use Incubation to keep your health topped off.
Save Maw for when the team is fairly clumped and watch out for the anti-timings. Hopefully if you're playing with friends or a team, you know who's going first on heroics. If your team is light on interrupts, you may want to save Maw for channelled abilities like Nazeebo spirit, Valla, etc.
Map Tips Top
 Haunted Mines
The very small number of merc camps on this map make non-hero damage even less important. The small upper level also means mobility (creep speed, Nydus, etc.) are also less valuable.
I find
Demolitionist better here than on other maps. With only 2 lanes, there's a good chance your team will push well into a wall before it's time to go into the mines. Downing a tower or two can let your golem stay alive a lot longer and probably finish a keep. It's also hard to stay on creep on this level with so much running in and out of the mines. The creep also gets cleared a lot due to only having 2 lanes where the fights take place. That said, I still won't take it unless I know my team is going to push hard in my lane.
You (and the larger portion of your team) should go to the lane your golem will push to try to get him an advantage. You're great at pushing back heroes and this is the lane where you will probably.
Whenever you're going in the mines, drop a creep at the entrance and then every intersection you pass. Knowing when the enemies are coming in for a counter in the mines is very important. You have no escapes, so be very careful about getting caught solo in the mines. Unless you left a really strong trail of creep, you probably won't get away if you're engaged with no peel.
On the first few golems, the small camps give a lot more skulls than killing the golem and with a lot less effort. Don't go for the golem first, even though Zagara's good at that.
Grab your giants after mines. They can do really good damage against the enemy's golem. To get the most out of them, wait until the enemy golem is at their own fort (not keep) before capping to make sure the giants stay behind your wall and hit the golem without taking damage. After the golem is down, they'll still be up for a merc push. On the 2nd or 3rd golem, if your first fort is still up, cap the giants right after the golems spawn.
Because you will win this game in your golem lane nearly 100% of the time, the bruiser camp on this map is probably the least valuable merc camp on any map. Don't bother with it. At low/mid levels of play, your teammates may go for it, in which case you'll probably have to help them so they don't get 4v5d while doing it. About the only time it's good to clear this camp is when you get your butt kicked in the mines and only the golem is left. The other team is going to get the last 30 for sure, so you might as well try to get some push up top while they finish the bottom. It's better than streaming into the mines 1-2 at a time as you rez.
 Cursed Hollow
Spread creep aggressively so your team knows where the enemies will be on tributes.
Devouring Maw is a must. Grabbing a single merc between each tribute is a good idea, but only do one and do it immediately after the tribute so you're ready to help your team before the next tribute.
Try to keep creep by your own golem, if not both, for vision to set up counters.
 Dragon Shire
At my level of play I prefer the lower shrine. Creep can give you vision through the bushes. And you're close to 3 giant camps.
At high levels of play teams will rotate 4 people between bottom and mid. In that scenario, you're best alone in the top. Your job in that case is to soak/bully your lane and not necessarily to get the shrine. At that level of play it's rare for either team to get both shrines and the DK without a few kills or a big level lead anyway.
 Blackheart's Bay
Be sure to help your team on every turn in. Use creep in the middle to watch for enemies at the turn in, offensively and defensively. Often your team will want you bottom so the other 4 can rotate between top and mid quickly.
If you find yourself on the top of the map, place creep near the golem. Knowing the enemy is going can set up an excellent counter gank. If your team is all alive and the other team is smart, they'll see the creep and reconsider going for the golem. That is also a win, as they wasted time. If they do go for it and your team is all alive, beg your team to go immediately. Your opponents will have basic abilities on cooldown, may have taken some damage, be clumped in a small area and, if the golem is still alive, may get rooted while trying to fight. Yummy.
Whenever you have time near mid, try to place 2-3 overlapping tumors, to make it hard for the opponents to clear and impossible to turn in without your team seeing the attempt.
You can pile up coins quickly between mercs and pirates. Chests pop quickly with banelings, but note that if you're close to the chest, banelings will path around it as though it were a corner they're trying to miss to get to their target. So only use banelnigs on the chest from a decent distance away.
 Garden of Terror
Try to have creep near the horror spawn points so you know when the enemy team is going for one. The seeds on the side are especially quick for you to grab.
In the early game it's better to get lane XP than to go for the plant horror's seeds, but if your team is close and going for it, help them. If the opponents are grabbing theirs, work with your team to stop them.
Try to start a merc camp just before your team spawns a terror. It lets you get a nice split push. If you don't tag them before your teammate grabs the terror, though, they all poof.
Sky Temple
Try to keep vision on the boss. If the enemies go for the boss and they're not up 1-2 heroes and your team doesn't ignore your pings, you should be able to win a team fight there and earn a boss after they all die. Try to place creep around shrines so that you see the enemies coming, as you will likely not escape if they surprise you. Shrines spawn 2 minutes after the last shrines finish. Try to get mercs pushing just before the next shrines spawn to make the enemy decide between all being at the shrine or clearing mercs.
Tomb of the Spider Queen
This is probably your best map. You are really strong in lane and your creep can give vision for turn ins. Your roaches are really good at interrupting turnins from a safe distance, followed by a hydra to scare them off until your team comes.
Normally I go to top or bottom on other maps to make gank squads go more out of their way to kill me. On this map I go middle to be able to drop creep on 2 turn-in points. At high levels of play teams often rotate 4 between top and mid, making you the best choice to solo/bully bottom.
This map is a little weird because ganking is easier and more important than anywhere else. So while you can easily push the enemy minions hard, you probably don't want to. That forces you on their side of the lane where you might get ganked and have little escapes. For that reason, play reserved on this map and use your mana mostly for damaging enemy heroes rather than worrying about minion damage. Your job on this map is not to push lanes or get kills. Your job is to provide vision, soak xp, gather gems and most important interrupt turn ins.
Endless Creep is pretty good on this map, but then again
Rapid Incubation is even better than normal because staying in lane is more important than ever.
Mercs aren't as important as other maps because the objectives don't take enemy heroes away from their lanes. They're decent if you can get them to push with a turn-in spider wave, but I wouldn't go out of your way to grab these on this map. The boss on this map is far back in a choke point with a cyclone knockback, making him a huge trap if the enemy team is observant. Don't go for it unless the other team is down a couple of heroes or they're all busy defending spiders (that last part is still risky, though).
Playing against Zagara Top
- Almost no hero can 1v1 Zagara. Early game if you have a roaming squad, try to catch her out. If not, at least don't leave a hero in lane against her 1v1, especially a melee.
- If you do have to 1v1 Zagara in a lane, do it safely from a distance. It's better to let her push a bit than to die.
- Watch for the purple mark over your head and listen for the hunter sound. When Zagara spawns it, run away immediately.
- If Zagara spawns a hunter against a teammate and it's not a team fight where your team is about to kill a hero, kill the hunter. This will save you a lot of damage and get your teammate back in the fight a lot quicker.
- Clear creep. Aim AE abilities at the center of creep patches. It cuts down Zagara's sustain a lot and reduces her team's map awareness.
Arthas can do this with his pulse.
Burning Rage is also good for that, though most heroes have better talents than burning rage.
- Move sideways to avoid
Baneling Barrage.
- At level 7, check which talent she got to see if she gets
Envenom. If she did, make sure you don't get below half health when engaging her.
- If Zagara took
Devouring Maw, don't clump. Also, try to use channeled heroics after Maw goes off or at least from enough range that it would be hard for Zagara to get to you to stop it.
- If Zagara overextended, kill her. She is squishy and has almost no escape moves.


Quick Comment (36) View Comments
You need to log in before commenting.